How to Run ChatGPT Ads: A Complete Step-by-Step Guide
Many people use ChatGPT to find information or make decisions, and now it comes with its own advertising system.
According to OpenAI, ChatGPT Ads can appear below the end of a response when there is a relevant match to the conversation.
Advertisers can create and manage ChatGPT Ads campaigns through OpenAI Ads Manager Beta.
Visit ads.openai.com and sign in with your OpenAI account. If you do not have an account, you can create one during sign-up.
Once you are signed in, follow these steps to complete the account setup and run ChatGPT Ads.
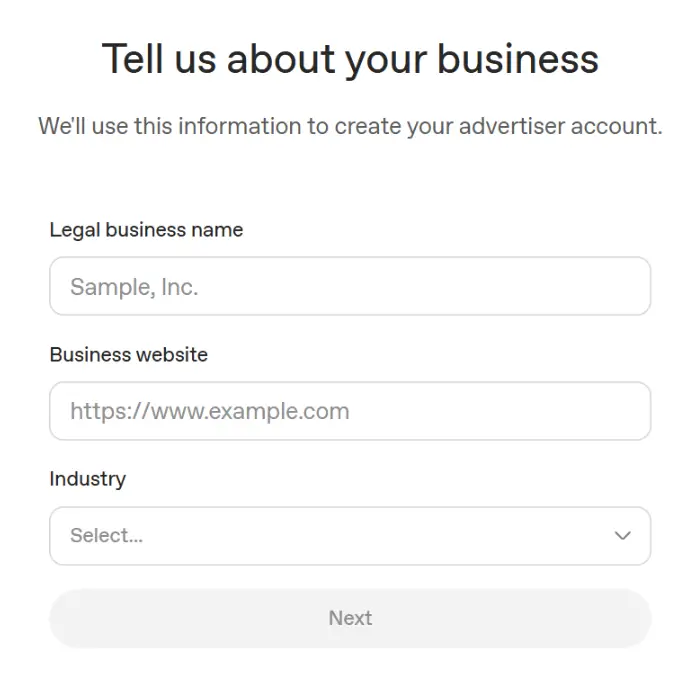
1. Enter Your Business Details
Ads Manager first asks for basic information about the business being advertised. OpenAI uses this information to create the advertiser account.
Enter the following details:
- Legal business name: Enter the official name of your business.
- Business website: Add the main website connected to the business.
- Industry: Select the available category that most closely describes the business.
Check that the business name and website are correct before continuing.
2. Confirm Your Advertiser Account Details
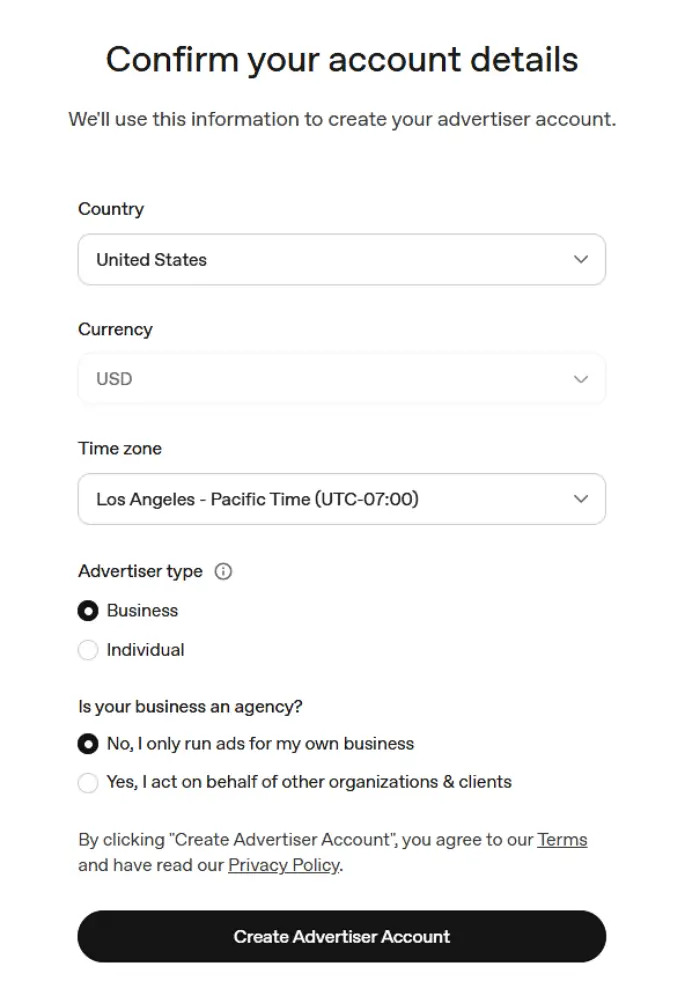
Next, choose the settings connected to the advertiser account:
- Country: Select the country where the advertiser is based.
- Currency: Choose the currency used for campaign budgets and billing.
- Time zone: Select the time zone used for campaign schedules and reports.
- Advertiser type: Choose Business or Individual.
- Agency status: Confirm whether you advertise for your own business or on behalf of other organizations and clients.
Review these settings before selecting Create Advertiser Account. Some account details may be difficult to change later.
3. Add Your Billing Information
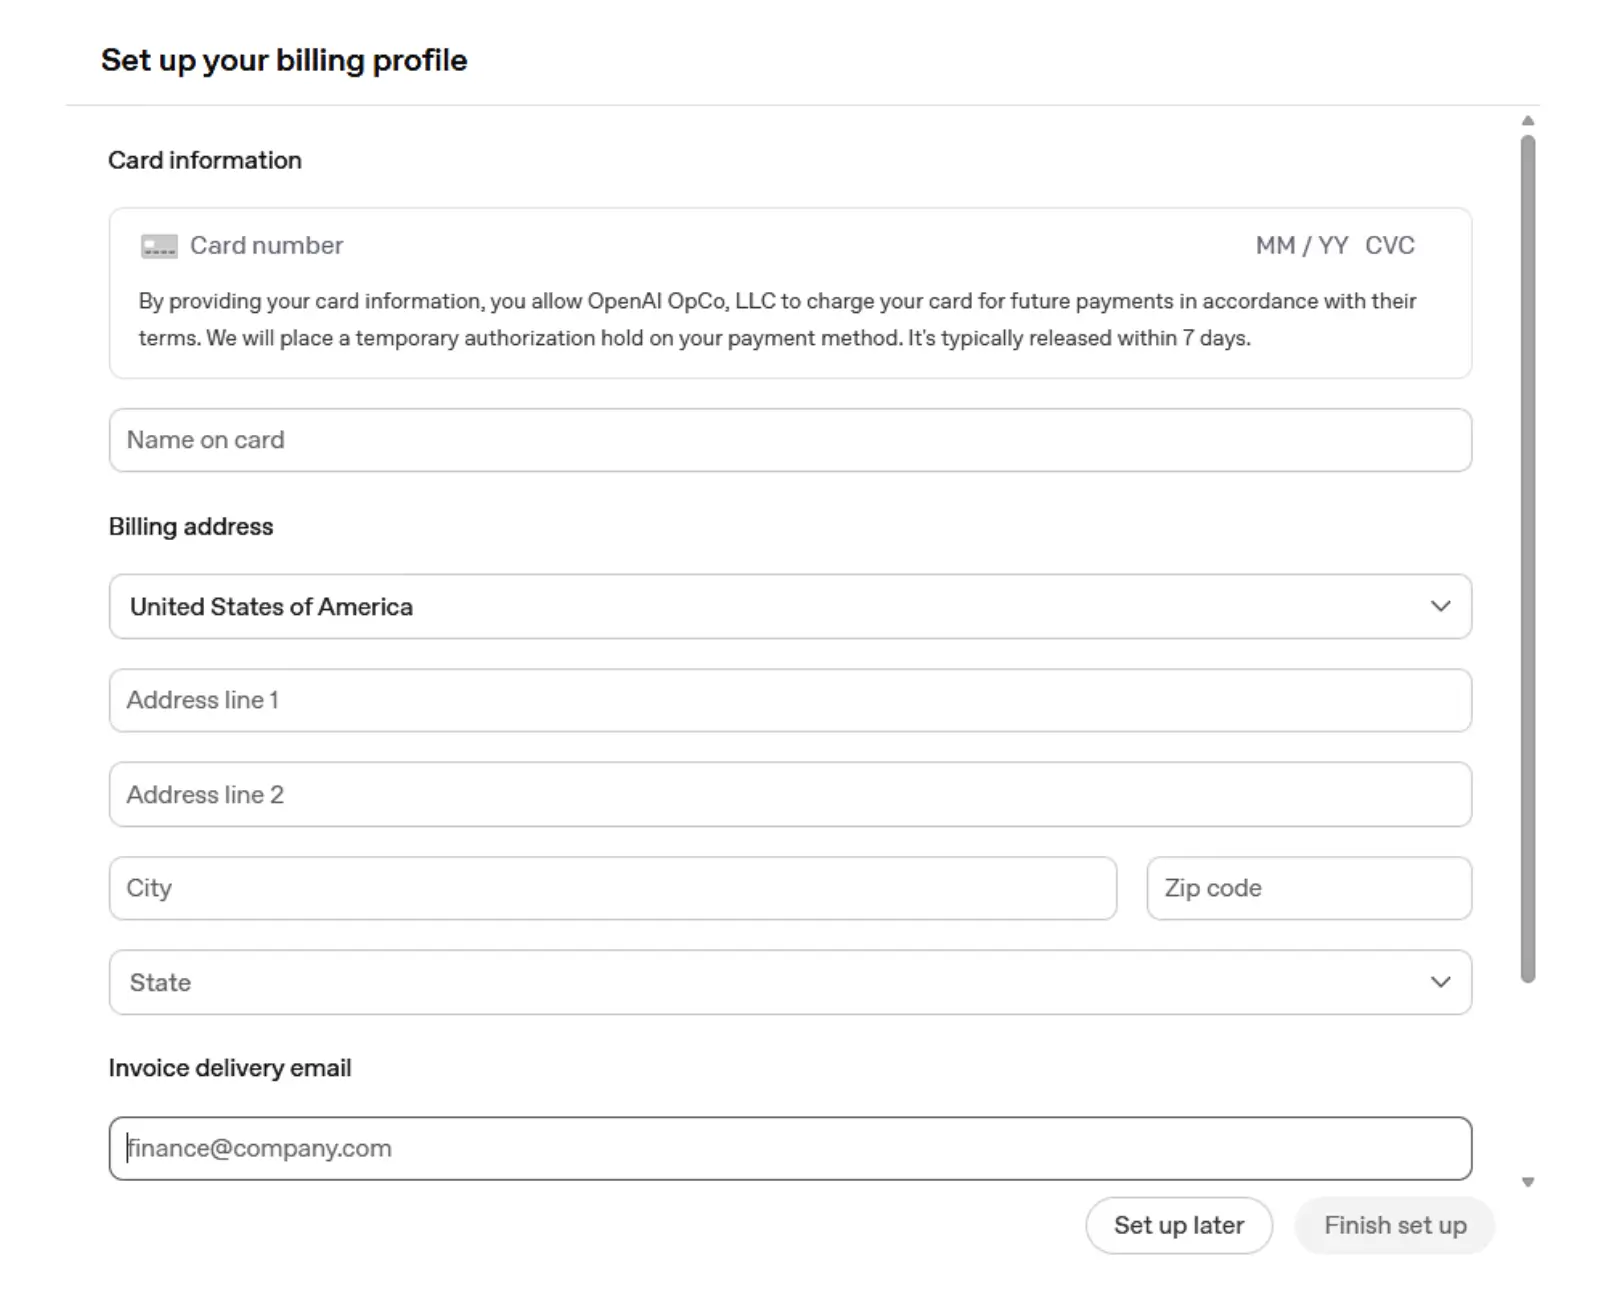
Set up the billing profile and add a supported payment method. Campaigns may not begin delivering until billing has been completed.
Enter:
- Card details: Card number, expiry date, CVC and name on the card
- Billing details: Billing country, complete address and invoice delivery email
The invoice delivery email will receive billing-related communication.
Check that the billing information matches the payment method before continuing.
4. Set Up Conversion Tracking if Needed
Conversion tracking shows whether someone completes an action after selecting your ad. This action could be a purchase, form submission or registration.
First, create a data source for your website in Ads Manager. This connects website activity to your ad account.
You can then send conversion information in either of these ways:
- OpenAI Pixel: Add a small piece of code to your website.
- Conversions API: Send conversion information from your website’s server.
You can use one method or both. Conversion tracking is required for a Conversions campaign. It is optional when the objective is Reach or Clicks.
5. Create a Campaign
A ChatGPT Ads campaign defines how your ads will be organized and delivered. It includes the objective, locations, platforms, schedule and budget.
The ad groups and ads you create next will sit within this campaign and follow its settings.
Start by entering a campaign name. Then select the Campaign type:
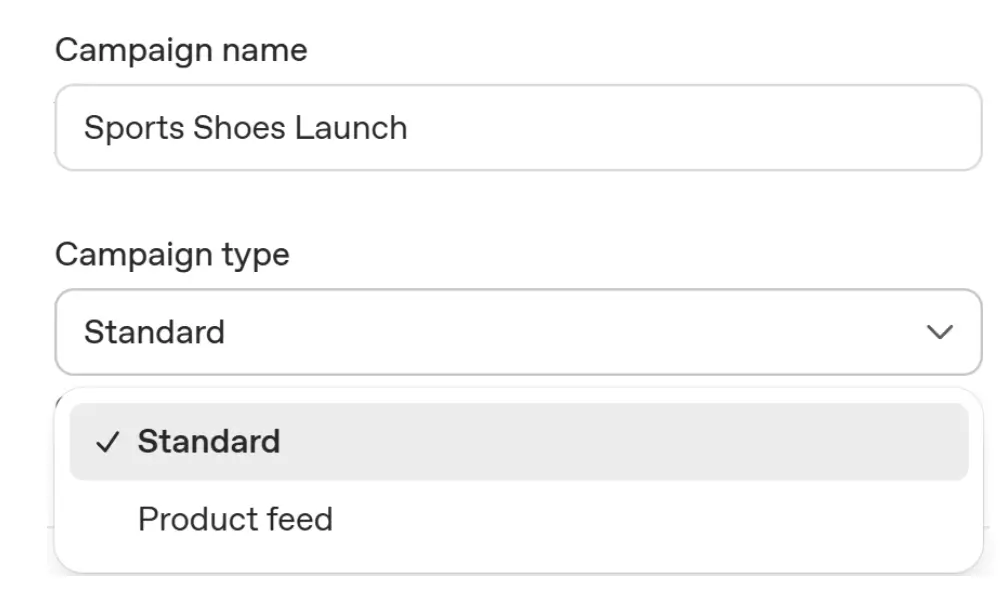
- Standard: Create each ad by adding its title, description, image and destination URL.
- Product feed: Connect a catalog containing your product information. After you create one product-ad template, Ads Manager uses the details, image and destination URL of an eligible product to display the ad.
We have chosen the Standard campaign type. Next, select the objective based on the result you want:
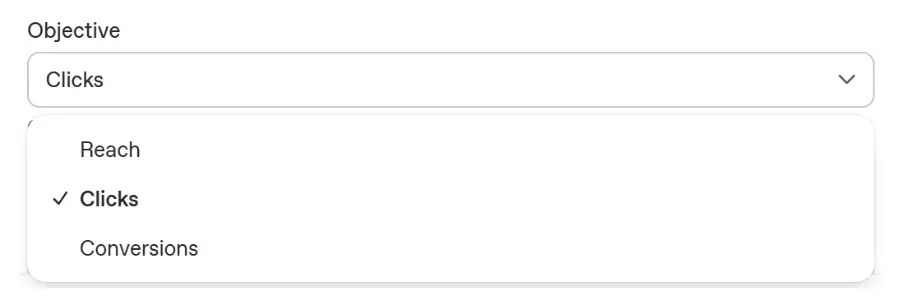
- Reach: Show the ads to more people.
- Clicks: Bring visitors to a landing page.
- Conversions: Focus on tracked actions such as purchases or form submissions.
Then complete these campaign settings:
- Conversion event: Choose the event you want to track, such as a purchase or sign-up. This is optional for Reach and Clicks but required for Conversions.
- Locations: Choose where the ads can be shown.
- Excluded locations: Select where the ads should not be shown.
- Eligible platforms: Select iOS app, Android app, Web or All platforms.
- Landing page query parameters: Add optional tracking parameters to destination URLs.
- Custom audiences: Select audiences to include or exclude.
- Budget: Enter the average amount you are willing to spend each day.
- Start date: Choose when the campaign should begin.
- End date: Set an optional date for the campaign to stop.
The following table shows an example campaign setup for a sports-shoes promotion:
| Campaign element | Example setting |
|---|---|
| Campaign name | Sports Shoes Launch |
| Campaign type | Standard |
| Objective | Clicks |
| Conversion event | Not selected |
| Locations | United States |
| Excluded locations | — |
| Eligible platforms | All platforms |
| Landing page query parameters | campaign_id={campaign_id}&ad_group_id={ad_group_id}&ad_id={ad_id} |
| Custom audiences | No custom audience selected |
| Budget | $100 average daily budget |
| Start date | September 1, 2026 at 9:00 AM |
| End date | September 30, 2026 at 11:59 PM |
6. Create an Ad Group
After creating the campaign, set up an ad group. It helps you organize ads for the same product or offer.
First, enter a name for the ad group.
Next, set the bid. The available options depend on the campaign objective selected in Step 5:
- For a Reach campaign, enter a Maximum CPM bid.
- For a Clicks campaign, select Maximize results or Manual: Max CPC.
- For a Conversions campaign, select Maximize results or Manual: Max bid.
Maximize results allows Ads Manager to adjust bids automatically. A manual option lets you set the maximum bid yourself.
Then complete the remaining ad-group settings:
- Landing page query parameters: Add optional tracking details to the landing-page URL. These details can help identify which campaign or ad brought the visitor.
- Default Ad Destination URL: Enter the page that new ads in this ad group should open by default.
- Context hints: Describe conversations or topics where your product may be relevant. These hints are optional and are not exact-match targeting rules.
Continuing with the Sports Shoes Launch campaign, an ad group would look like this:
| Ad-group element | Example setting |
|---|---|
| Ad group name | Running Shoes Online Promotion |
| Bid strategy | Maximize results |
| Landing page query parameters | campaign_id={campaign_id}&ad_group_id={ad_group_id}&ad_id={ad_id} |
| Default Ad Destination URL | https://example.com/running-shoes |
| Context hints | People comparing comfortable running shoes for regular jogging |
7. Create an Ad
After setting up the ad group, create an ad for the product or offer.
Start by entering an ad name. This name is used to manage the ad in Ads Manager and is not shown to users.
Under Ad creative, complete these details:
- Ad Destination URL: Enter the page you want people to visit after selecting the ad.
- Landing page query parameters: Add optional tracking details for this ad. Leave this field blank if you do not need additional ad-level tracking.
- Title: Write an ad title of up to 50 characters.
- Description: Describe the offer in up to 100 characters.
- Ad images: Upload a PNG or JPG image before creating the ad. For better quality, use a square image of at least 256 × 256 pixels.
Continuing with the Running Shoes example, here is a sample ad:
| Ad element | Example |
| Ad name | Daily Running Collection |
| Ad Destination URL | https://example.com/running-shoes |
| Landing page query parameters | Uses the ad-group settings |
| Title | Cushioned Shoes for Daily Runs |
| Description | Enjoy lightweight comfort on every run. |
| Ad image | A pair of running shoes on a clean background |
8. Review and Submit the Campaign
After completing the ad, Ads Manager displays a Campaign summary before submission.
Review the information shown on this page:
- Campaign details: Check the campaign name, objective, locations, platforms and average daily budget.
- Business logo: Add a logo if Ads Manager could not find one.
- Ad-group details: Check the ad-group name, website URL, bid and context hints.
- Generated ad: Preview the title, description and image as they may appear to users.
Correct any inaccurate information before submitting the campaign.
After submission, the ad may appear as In review, Approved or Rejected. A rejected ad can be edited and submitted for another review.
9. Measure Campaign Performance
After the campaign starts running, open the Performance trend section in Ads Manager.
Select 7 days, 14 days, 30 days or a custom date range. You can also choose a campaign or apply a segment.
The dashboard shows these metrics:
- Spend: The amount spent on the ads.
- Impressions: The number of times the ads were shown.
- Clicks: The number of clicks the ads received.
- CPC: The average cost of each click.
- Conversions: The number of tracked actions completed after an ad interaction.
Compare different date ranges to see how the campaign’s performance changes over time.
10. Keep the Campaign Updated
Performance data can help you decide whether the campaign needs a change. You can update the budget, bid, context hints, destination page or ad creative based on what the dashboard shows.
| What the dashboard shows | Action you can take |
|---|---|
| Few or no impressions | Confirm that the campaign is active and the ad is approved. Review the bid, budget, locations and platforms. |
| Impressions but few clicks | Improve the title, description or image. Make sure the ad matches the offer. |
| Clicks but no conversions | Check that conversion tracking works. Review the landing page and the action you want visitors to complete. |
| CPC is higher than expected | Review the bid strategy. Lower the manual bid if needed. |
| Spend is increasing too quickly | Reduce the daily budget or adjust the bid. |
| The wrong type of traffic is arriving | Review the context hints and landing page. Remove hints that do not match the offer. |
| Results remain steady | Keep the current settings and continue monitoring the campaign. |
Avoid changing several settings at the same time. Make one useful change and then check the performance again.