ChatGPT Ads Custom Audiences: Setup Guide
Custom Audiences let advertisers use their own customer or prospect lists in ChatGPT Ads. These audiences can be created and managed in Ads Manager and used for campaign inclusion, exclusion, or ad-group bid adjustments.
1. What Are Custom Audiences in ChatGPT Ads?
Custom Audiences are audience lists created from customer or prospect data provided by an advertiser. They let advertisers use their own audience data to control how a campaign reaches people in ChatGPT Ads.
OpenAI currently supports Custom Audiences for three main purposes:
- Campaign-Level Inclusion: Limits a campaign to people who match a Custom Audience. This lets advertisers focus campaign delivery on a specific audience list.
- Campaign-Level Exclusion: Prevents a campaign from reaching people who match a Custom Audience. This lets advertisers keep a specific audience out of the campaign.
- Ad-Group Audience Bid Adjustments: This lets advertisers change an ad group’s maximum bid when a viewer matches a Custom Audience.
These controls work at the audience level. Ads Manager does not show individual matched users or allow advertisers to select individual people from a Custom Audience.
2. Supported Audience Identifiers
OpenAI currently supports five identifier types for Custom Audiences:
- Email address
- Phone number
- SHA-256 hashed email address
- SHA-256 hashed phone number
- Google Advertising ID (GAID)
These identifier types can be used when preparing the audience file for upload. Supported identifier types can also be mixed within the same CSV upload.
3. Identifier Formatting Requirements
Each supported identifier has its own formatting requirements.
3.1 Email Address
A valid email address can be uploaded directly.
Email addresses are normalized before matching. Uppercase letters are converted to lowercase, and leading and trailing spaces are removed.
3.2 Phone Number
Phone numbers must use E.164 format, including the + sign and country code.
Formatting characters such as spaces, dashes, parentheses, and periods are removed during normalization.
3.3 SHA-256 Hashed Email Address
The email address should first be normalized by converting it to lowercase and removing leading and trailing spaces.
The normalized email address is then hashed using SHA-256.
The uploaded value must be a 64-character SHA-256 hexadecimal digest.
3.4 SHA-256 Hashed Phone Number
The phone number should first be normalized to E.164 format, including the + sign and country code.
The normalized phone number is then hashed using SHA-256.
The uploaded value must be a 64-character SHA-256 hexadecimal digest.
3.5 Google Advertising ID (GAID)
Use a valid Google Advertising ID.
GAIDs should not be hashed, and their dashes should not be removed.
4. Preparing the Custom Audience File
Before creating a Custom Audience, prepare a valid UTF-8 CSV or TXT file.
4.1 TXT File
A TXT file must contain one identifier per line.
When uploading a TXT file, Ads Manager asks you to select the identifier type used in that file.
4.2 CSV File
A CSV file must contain a header row.
Supported column names include:
emailphone_numberemail_sha256phone_number_sha256gaid
For CSV files with supported headers, Ads Manager can infer the identifier type from the header.
4.3 File Size and Audience Size
The maximum file size is 500 MB, or 500,000,000 bytes.
OpenAI states that audiences can contain more than 5,000,000 members. Additional members can be added through multiple uploads after the audience has been created.
5. How to Create a Custom Audience in Ads Manager
To create a Custom Audience, follow the setup flow in Ads Manager:
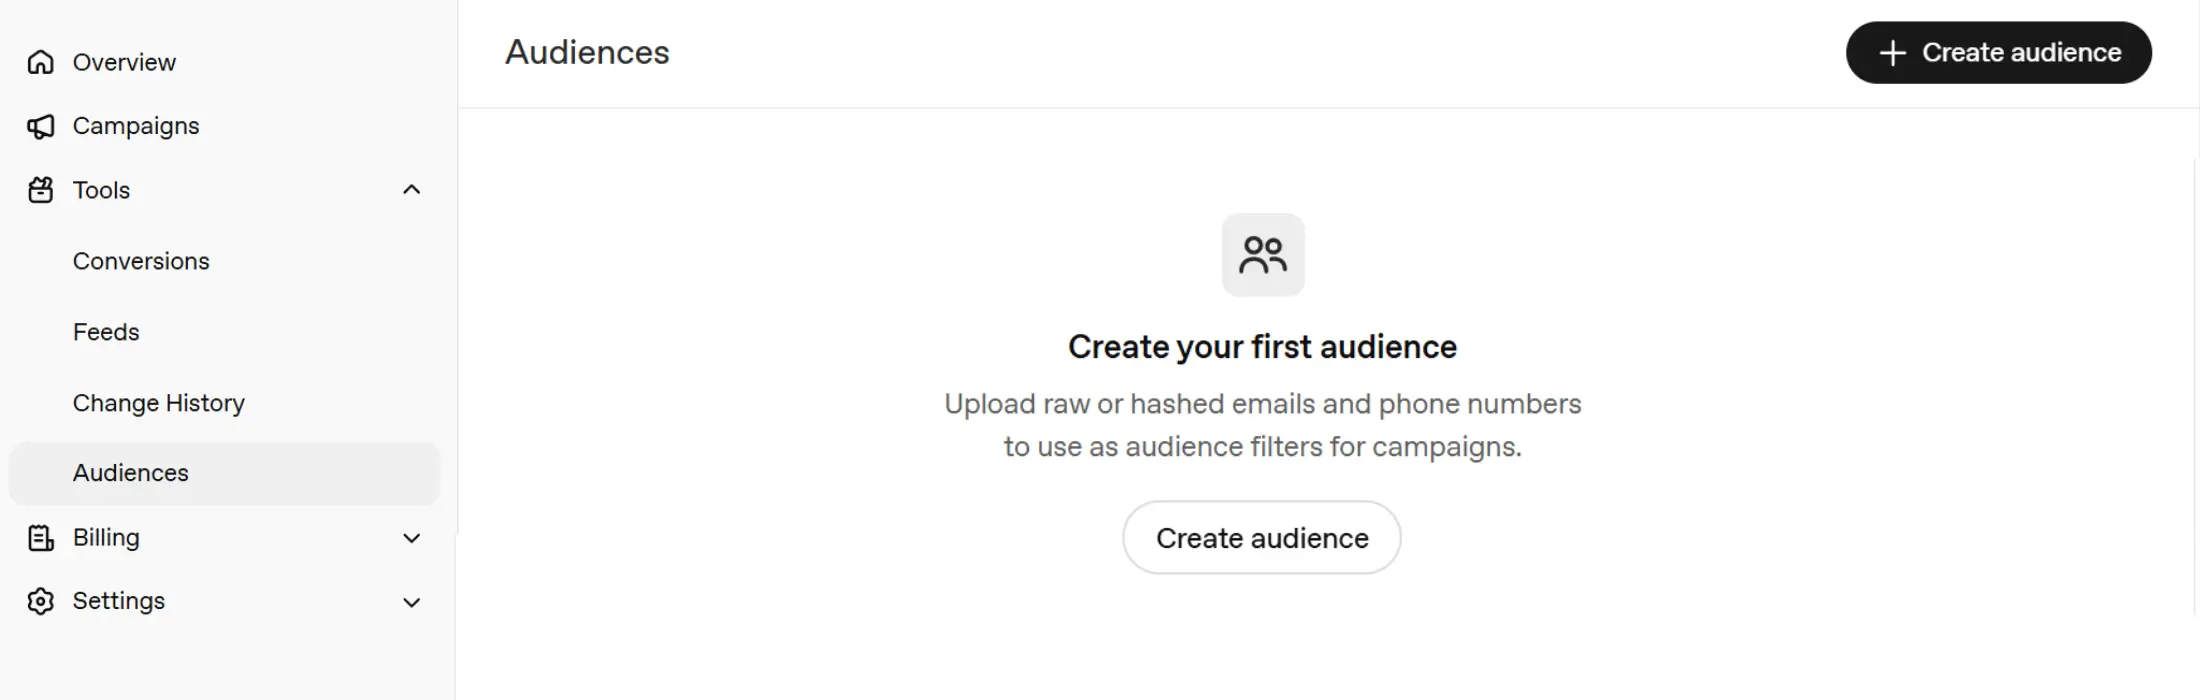
Step 1: Open Ads Manager and expand Tools from the left sidebar.
Step 2: From the available tools, select Audiences.
Step 3: On the Audiences page, select Create audience to start setting up a new Custom Audience.
Step 4: Enter a clear audience name that makes the audience easy to identify later in Ads Manager. You can also add a description to briefly explain what the audience represents.
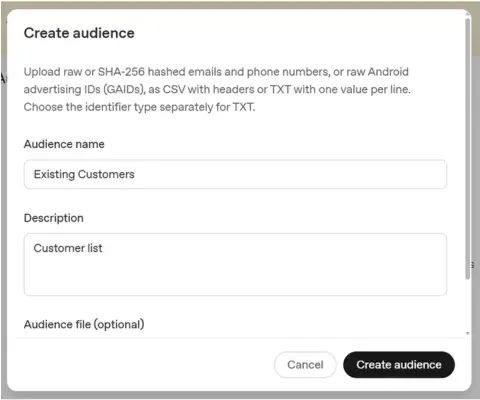
Step 5: Upload the prepared CSV or TXT audience file.
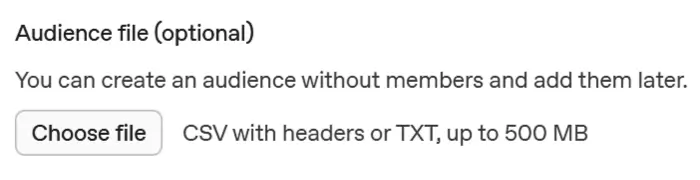
Step 6: If you are uploading a TXT file, select the identifier type used in the file. For a CSV file with supported headers, Ads Manager can infer the identifier type from the header.
Step 7: Review the audience information and select Create to submit the audience for processing.
Once submitted, Ads Manager processes the uploaded file. The audience becomes available for use after processing is complete.
6. Updating an Existing Custom Audience
After creating a Custom Audience, advertisers can manage its membership in Ads Manager.
The audience menu provides options to:
- Add members: Add new identifiers to the audience.
- Remove members: Remove identifiers from the audience.
- Replace members: Update the audience with a new list.
- Merge audiences: Combine 2 to 64 ready Custom Audiences into a new audience.
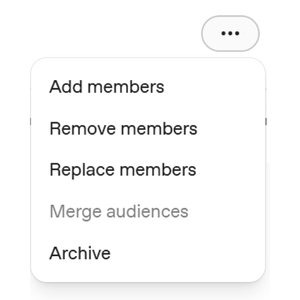
The original audiences remain unchanged when they are merged.
7. How Long Does Custom Audience Processing Take?
After an audience is created, Ads Manager processes the uploaded file.
OpenAI says processing usually takes about 20–30 minutes, although processing time can vary depending on the file size.
The audience must finish processing before it can be used.
8. Understanding Custom Audience Statuses
Ads Manager uses different statuses to show whether an audience is ready to use.
8.1 Processing
Processing means the file is still being processed and the audience is not ready yet.
8.2 Ready
Ready means the audience has been processed and can be used.
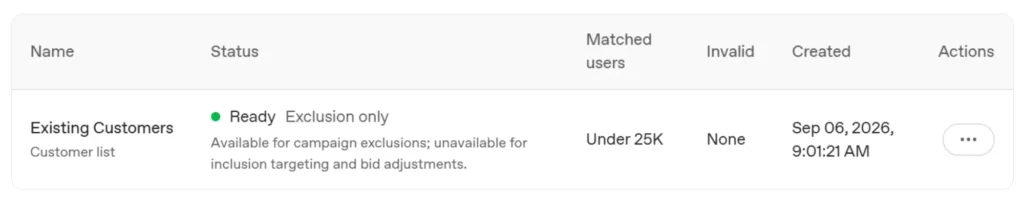
If the audience has fewer than 25,000 matched users, Ads Manager can show the audience as Ready — Exclusion only.
8.3 Failed
Failed means the file could not be processed.
The file should be checked for the required format, supported identifier types, file-size limit, and formatting requirements before trying again.
8.4 Other Processing Statuses
Ads Manager may also show intermediate statuses while an audience is being prepared. These indicate that processing has not yet finished.
9. Matched Users and the 25,000-User Requirement
The number of rows uploaded is not necessarily the same as the final number of matched users.
Invalid values, duplicate values, and identifiers that could not be matched do not count toward the matched-user total.
This means uploading 25,000 rows does not automatically result in 25,000 matched users. The relevant figure is the Matched users count shown after processing.
OpenAI requires at least 25,000 matched users for:
- Campaign-level inclusion
- Audience bid adjustments
Audiences with fewer than 25,000 matched users can still be used for campaign exclusions.
9.1 What Happens Below 25,000 Matched Users?
A Custom Audience with fewer than 25,000 matched users does not necessarily mean that the upload failed.
If processing succeeds, Ads Manager can show the audience as Ready — Exclusion only.
The audience cannot be used for campaign inclusion or audience bid adjustments because those uses require at least 25,000 matched users.
It can still be selected for campaign exclusion.
9.2 Recommended Audience Size
OpenAI recommends audiences of at least 100,000 users for inclusion targeting or bid adjustments.
Therefore, an audience can be successfully processed while still being limited to exclusion use if its matched-user count is below 25,000.
10. How to Use a Custom Audience in a Campaign
To use a Custom Audience in a campaign:
Step 1: Create or edit a campaign in Ads Manager.
Step 2: Go to the Custom audiences section in campaign setup.
Step 3: To limit campaign eligibility to an audience, select Include audience and choose the ready Custom Audience.
Step 4: To prevent campaign delivery to an audience, select Exclude audience and choose the ready Custom Audience.
Step 5: Review the campaign settings and save the campaign.
If both inclusion and exclusion are used, people who match an excluded audience are excluded from delivery even if they also match an included audience.
11. Custom Audience Bid Adjustments
Custom Audience bid adjustments work at the ad-group level. A bid multiplier can increase or decrease an ad group’s maximum bid when a viewer matches a selected Custom Audience.
To configure an audience bid adjustment:
Step 1: Create or edit an ad group in Ads Manager.
Step 2: Open Advanced settings.
Step 3: Go to Audience bid adjustments.
Step 4: Select Add multiplier.
Step 5: Choose a ready Custom Audience.
Step 6: Enter a multiplier between 0.1x and 10x.
Step 7: Save the ad group.
For example, if the normal maximum bid is $1 and you set a 2x multiplier, the maximum bid for a matching audience can increase to $2. A 0.5x multiplier can reduce a $1 maximum bid to $0.50.
A multiplier above 1x increases the maximum bid, while a multiplier below 1x decreases it.
If a viewer matches more than one selected Custom Audience, the highest matching multiplier is applied.
12. Updating an Existing Custom Audience
After creating a Custom Audience, advertisers can update its membership in Ads Manager.
OpenAI allows advertisers to:
- Add members
- Remove members
- Replace members
The audience does not need to be recreated when its membership is updated.
Campaigns and ad groups already using the audience do not need to be updated simply because the audience membership changes.
13. Uploaded Audience File Retention
Uploaded audience files are deleted after processing, usually no later than 24 hours after upload.
This applies to the uploaded audience file itself and is separate from the Custom Audience created in Ads Manager.