ChatGPT Ads Conversion Tracking: How It Works and How to Set It Up
ChatGPT Ads conversion tracking measures actions that occur on a website and connects eligible events with advertising activity. These actions can include purchases, form submissions, registrations, appointments and subscriptions.
The setup connects three parts:
- A data source connects the website with Ads Manager.
- A conversion event defines the action you want to measure.
- A campaign uses the selected event for reporting or conversion optimization.
1. How ChatGPT Ads Conversion Tracking Works
The ChatGPT Ads conversion-tracking process works in this order:
- You create a data source for your website.
- Ads Manager provides a Pixel ID and setup code.
- You install the setup code on the website.
- You create a conversion event for the required action.
- You add the event code where that action is completed.
- The Measurement Pixel sends the completed action as an event.
- Event Stream can confirm whether the recent browser event reached OpenAI.
- If the event meets the attribution requirements, it can appear in conversion reporting.
For example, an advertiser can create a lead_created event for a contact form. When someone successfully submits the form, the website sends that event through the Measurement Pixel.
2. Find Conversions in Ads Manager
Sign in to ChatGPT Ads Manager. Open Tools from the left menu and select Conversions.
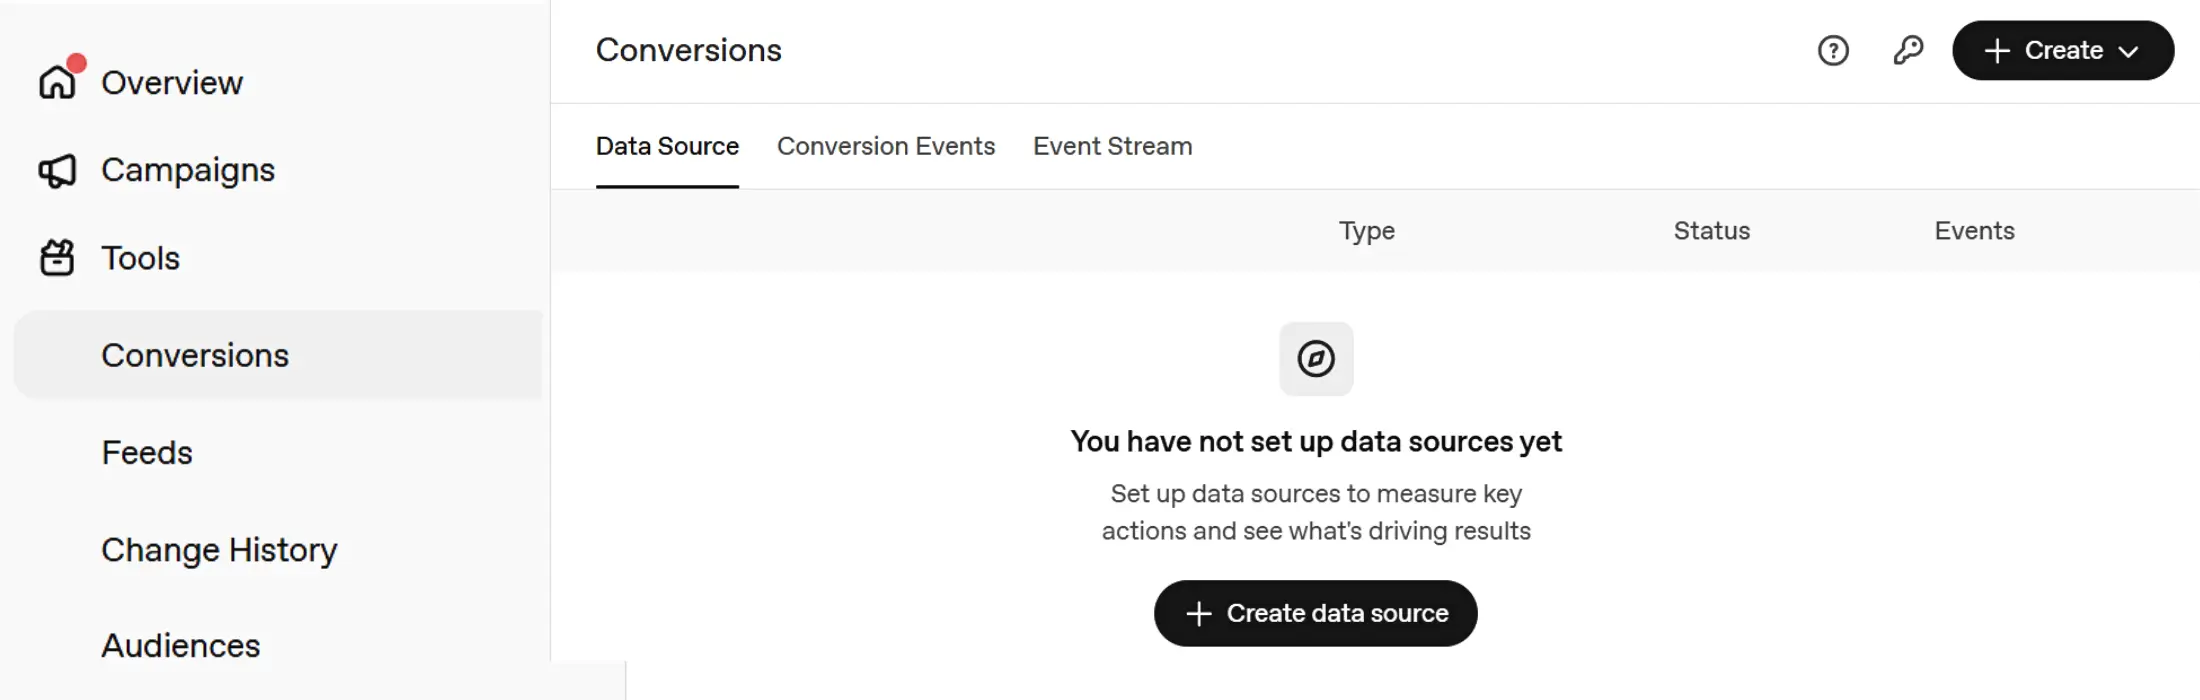
The Conversions area contains three tabs:
- Data Source: Create and manage website data sources.
- Conversion Events: Create the actions you want to measure.
- Event Stream: Check whether recent Measurement Pixel events reached OpenAI.
The Create menu in the upper-right corner contains two options.
Data Source
Choose Data Source when you are connecting a website for the first time. Ads Manager will create a Pixel ID and provide the main setup code.
Conversion Event
Choose Conversion Event when a data source already exists and you want to create an event for a purchase, form submission or another action.
For a new setup, follow this order:
Data Source → Install Pixel → Create Conversion Event → Add Event Code → Test Event → Connect Event to Campaign
3. Create a Data Source
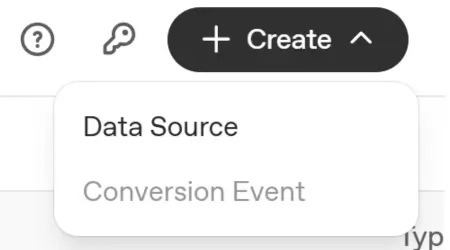
Open the Create menu and select Data Source.
Enter a Data Source Name
Enter a name to identify the data source in Ads Manager.
For example: My first pixel
Data Source Name: My first pixel
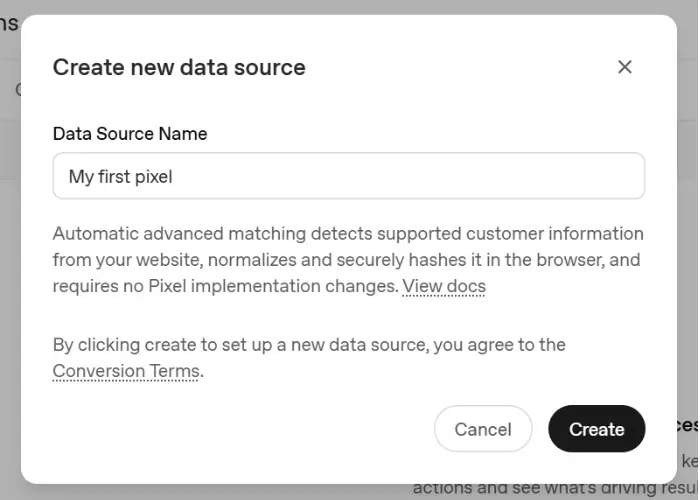
The name is used to identify the data source inside Ads Manager. It does not make any changes to the website.
Ads Manager also provides information about automatic advanced matching. This feature uses customer information in a protected form to help match website conversions with ads.
Select Create to create the data source.
After creating the data source, Ads Manager displays:
- Pixel ID: Identifies the data source.
- Setup code: The Measurement Pixel JavaScript code that connects the website to the data source.
Copy the complete setup code and add it near the top of the HTML <head> section. Add only one Pixel setup code to each page where you want to measure events.
For WordPress, you can use a plugin such as WPCode, Header Footer Code Manager or Head, Footer and Post Injections. Paste the setup code into the plugin’s Header area and save it. The code remains after theme updates as long as the plugin stays installed and active.
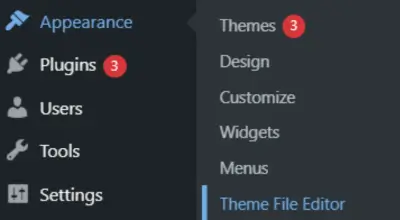
If you want to add the code manually and the Theme File Editor is available, open Appearance → Theme File Editor → Theme Header (header.php). Paste the code directly below the opening <head> tag and select Update File. A parent-theme update can remove code added directly to this file.
The setup code loads the Measurement Pixel on the website. After installing it, select Next: create conversion event to continue.
4. Create a Conversion Event
A conversion event is the action you want to measure as a conversion in Ads Manager.
You can open the conversion-event form in two ways:
- Select Next: create conversion event after creating the data source.
- Open the Create menu and select Conversion Event.
After opening the form, the Create custom conversion window appears. Complete the fields shown in the form.
Data Source
Select the data source connected to the website where the conversion will occur.
For example:
Data Source: My first pixel
Base Event
Choose the event that matches the action you want to measure.
| Base Event | When to use it |
|---|---|
app_installed | Someone installs an app |
app_opened | Someone opens an app |
appointment_scheduled | Someone books a meeting or consultation |
checkout_started | Someone starts the checkout process |
contents_viewed | Someone views a product, listing or article |
items_added | Someone adds an item to a cart or selection |
lead_created | Someone submits a lead form |
order_created | Someone completes a purchase |
page_viewed | Someone views a page |
registration_completed | Someone completes a registration |
subscription_created | Someone starts a paid subscription |
trial_started | Someone starts a free trial |
custom | The action does not match a standard event |
Use the event that matches the action you want to measure.
For example, use lead_created for a completed lead form submission.
Conversion Name
Enter a name that clearly describes the conversion.
For example:
Conversion Name: Contact Form Submission
The Conversion Name is the label shown in Ads Manager, while the Base Event identifies the event type.
Click-Through Attribution Window
Set the number of days for the click-through attribution window. The current setup uses a 30-day click-through attribution window.
This window determines how long an earlier ad click can receive credit for a later conversion. A conversion is reported only when it meets the applicable attribution requirements.
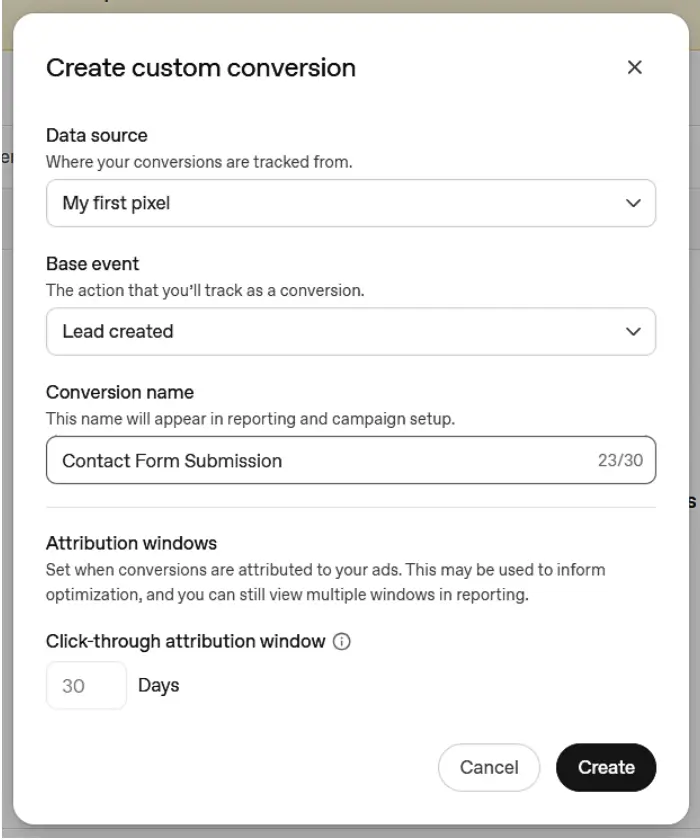
Review the selected data source, base event, conversion name and attribution window. Then create the conversion event.
5. Add the Conversion Event Code
After creating the conversion event, Ads Manager provides the Conversion Event Code.
The code section may show Pixel and Conversions API options, depending on the event and setup.
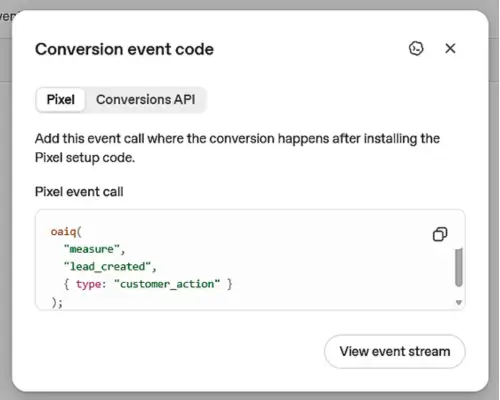
If Pixel is available, select Pixel to view the event code for the conversion you created. The event code records the selected conversion when the related action happens on your website.
For example, if you created a lead_created conversion for a form, Ads Manager may provide a code like this:
oaiq(
  "measure",
  "lead_created",
  { type: "customer_action" }
);
Add the event code to the form’s JavaScript so it runs after the form has been successfully submitted. It should not run simply when someone opens the form or clicks the submit button.
If Conversions API is available, select Conversions API to view the server-side event request. The Conversions API sends the conversion event directly from your website’s backend to OpenAI.
For events such as app_installed and app_opened, the Conversions API is required because these events cannot be sent through the JavaScript Pixel.
You can create the required Conversions API key directly from this screen by selecting Create conversion key, entering a name, and selecting Create.
You can also create a Conversions API key separately from Tools → Conversions. Select the key icon beside the help icon, choose Create new key, enter a name, and select Create.
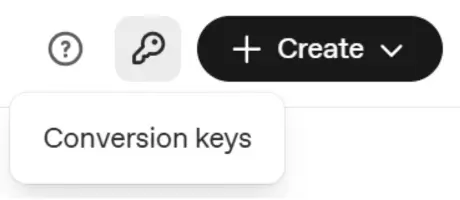
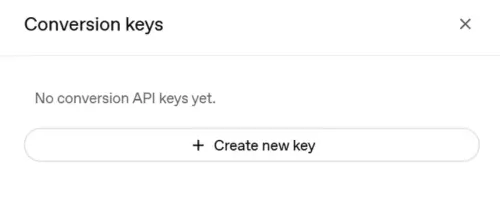
Ads Manager then displays the key. Copy it and store it securely. Do not add it to website HTML, browser code or public files.
To use the Conversions API, configure the website’s backend to send completed events to OpenAI using the Pixel ID and Conversion API key.
Another Way to Send Conversion Events
Image Tag
The Image Tag is a hidden 1 × 1 image added to a webpage. It sends one conversion event when the page loads without using JavaScript.
Add the Image Tag to the HTML <body> of the page where the event should be sent. Its URL must include the Pixel ID, event name and correct event data type.
For example, an Image Tag placed on a confirmation page sends an event when that page loads.
The current Create menu shown in Ads Manager does not include a separate Image Tag option. The Image Tag is added through the webpage’s HTML using the Pixel ID from the connected data source.
It cannot directly detect a button click, form submission or another action that happens after the page has loaded. Use the Measurement Pixel or Conversions API for those actions.
6. Test the Event in Event Stream
Open Event Stream from the Conversions section and select the relevant data source. Then click Start polling.
Starting polling does not create an event. It starts checking whether the selected Measurement Pixel is sending events.
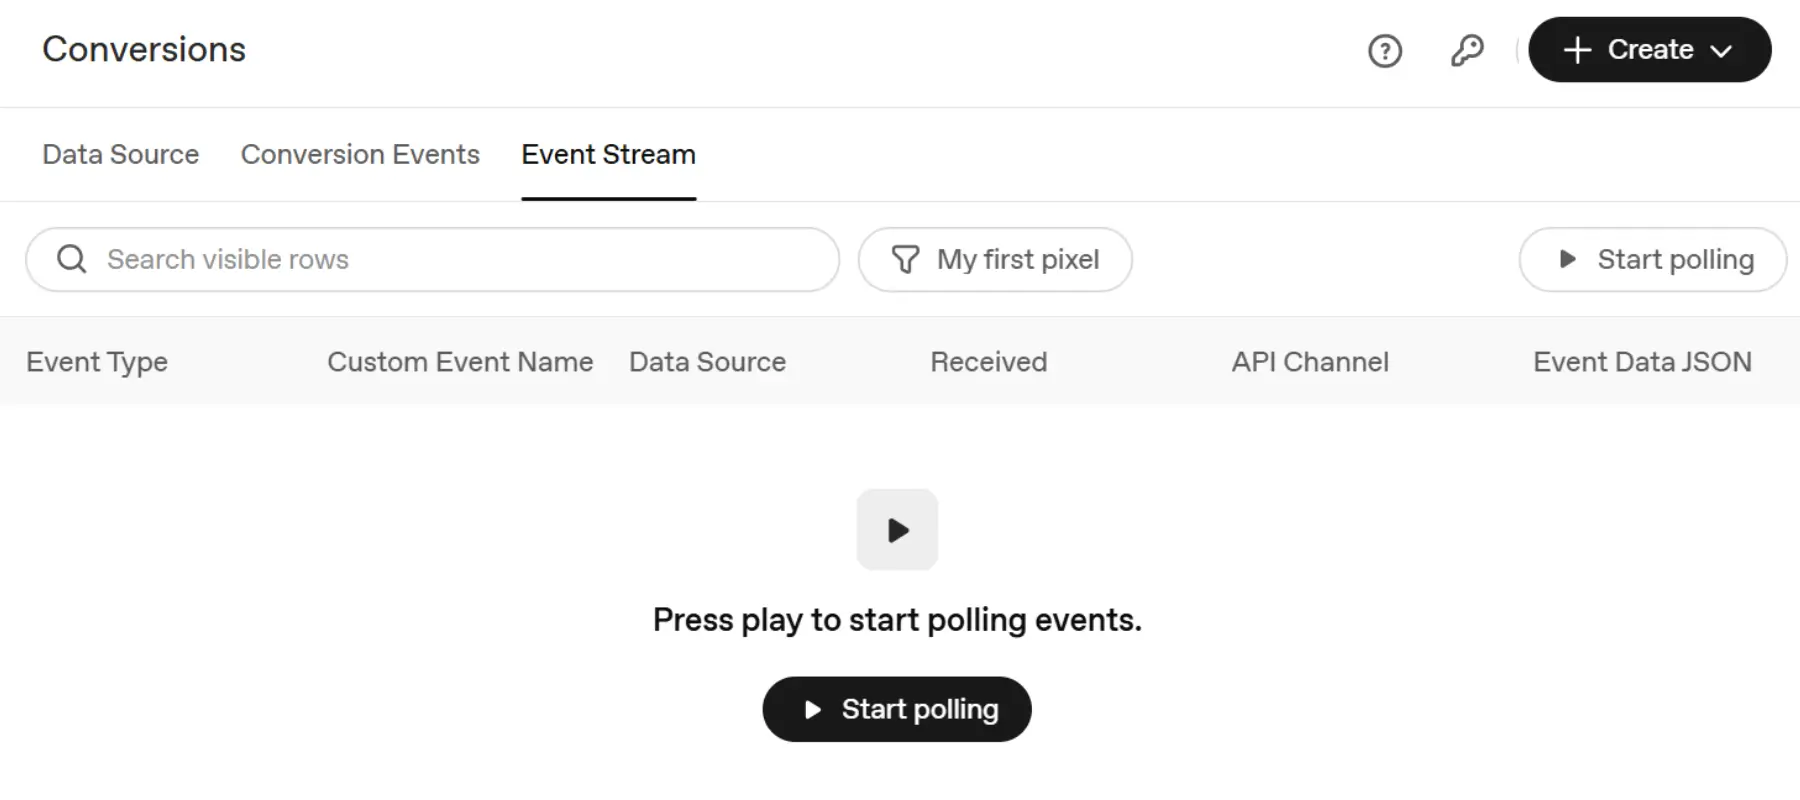
Keep Event Stream open and perform the action that should trigger the conversion. For example, submit the connected form if you are testing a lead_created event.
Once the event is received, Event Stream can show the following details:
| Column | What it shows |
|---|---|
| Event Type | The event that was received, such as lead_created |
| Custom Event Name | The name of a custom event, when applicable |
| Data Source | The data source associated with the event |
| Received | When the event was received |
| API Channel | The channel through which the event was sent |
| Event Data JSON | The data included with the event |
The conversion event stream shows up to 50 events received from the Measurement Pixel during the previous 15 minutes.
If more than 50 events were received during that period, Event Stream shows only the 50 most recent events. The older events do not appear in the Event Stream results.
This 50-event limit applies to the testing view. It does not mean that Ads Manager can process only 50 conversion events.
What “0 Recent Events Received” Means
This message means that Event Stream has not received a recent event from the selected Measurement Pixel.
Check that:
- The Pixel setup code is installed.
- The code contains the correct Pixel ID.
- You selected the correct data source.
- Start polling is active.
- The conversion event code runs after the action is completed.
- The event uses the correct name and data type.
- The website’s consent settings allow the event to be sent.
An event appearing in Event Stream confirms that the recent browser event reached OpenAI. It does not confirm that the event was connected to an ad or counted as a campaign conversion.
7. Connect the Event to a Campaign
After creating and testing the conversion event, connect it to a campaign.
Create a campaign and choose Conversions as the objective. Continue through the campaign settings until you reach the Conversion event section.
Open the dropdown and select the event you created earlier. This tells the campaign which action it should measure and optimize for.
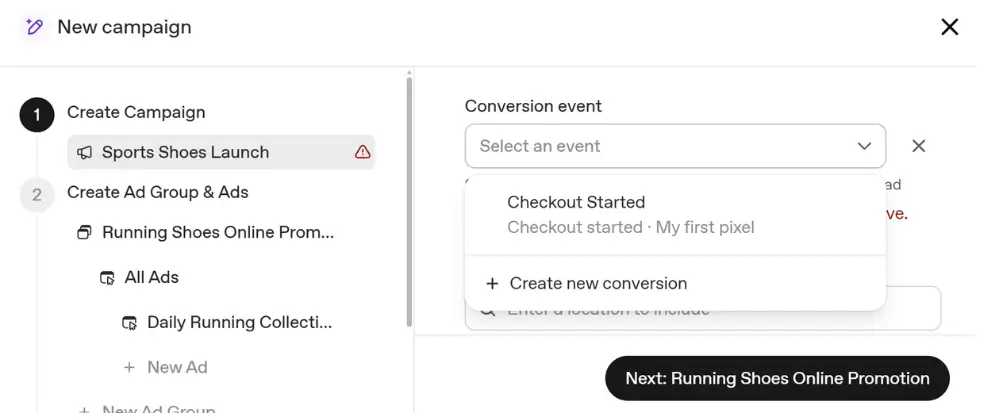
A conversion-optimized campaign requires one active standard conversion event. Standard events are predefined actions such as order_created, lead_created and registration_completed.
A custom event is used when none of the standard events describes the action. Custom events can be measured and reported, but they cannot be selected as the optimization goal for a conversion-optimized campaign.
The selected conversion event cannot be changed after the campaign is created. To use a different event, create a new campaign. Billing still happens for valid clicks, not for each conversion.
8. Review Conversion Results
After the campaign starts running, review its results in Ads Manager.
The main Conversions number shows how many selected actions were completed after eligible ad clicks. Review it with impressions, clicks, spend, CTR and average CPC to understand the campaign’s performance.
You can calculate the cost per conversion by dividing campaign spend by the total number of conversions.
If a conversion qualifies for both click-through and view-through attribution, click-through attribution takes priority.
Review enough conversion data before making major changes to the campaign budget, bid or creative.